- Published on
Polkadot Ink! Smart Contract Tutorial
Language: English
Level: Intermediate
Ink! Your Way to Decentralized Apps, A Polkadot Smart Contract Tutorial
Polkadot is not just another blockchain; it's a paradigm shift in blockchain architecture. Unlike traditional monolithic blockchains, Polkadot envisions a future of interconnected chains, ushering in a new era of cross-chain interoperability.
Imagine a network where specialized blockchains, each optimized for specific tasks, seamlessly communicate and transact with one another. This is the essence of Polkadot.
Ready to dive into the world of decentralized applications on Polkadot? This tutorial will guide you through building your first dApp using Ink!, Polkadot's powerful smart contract language.
I'll walk you through every step, from writing your first smart contract to deploying it on the Polkadot network. Finally, I'll show you how to interact with your creation using a built-in UI.
Let's get started! 🚀
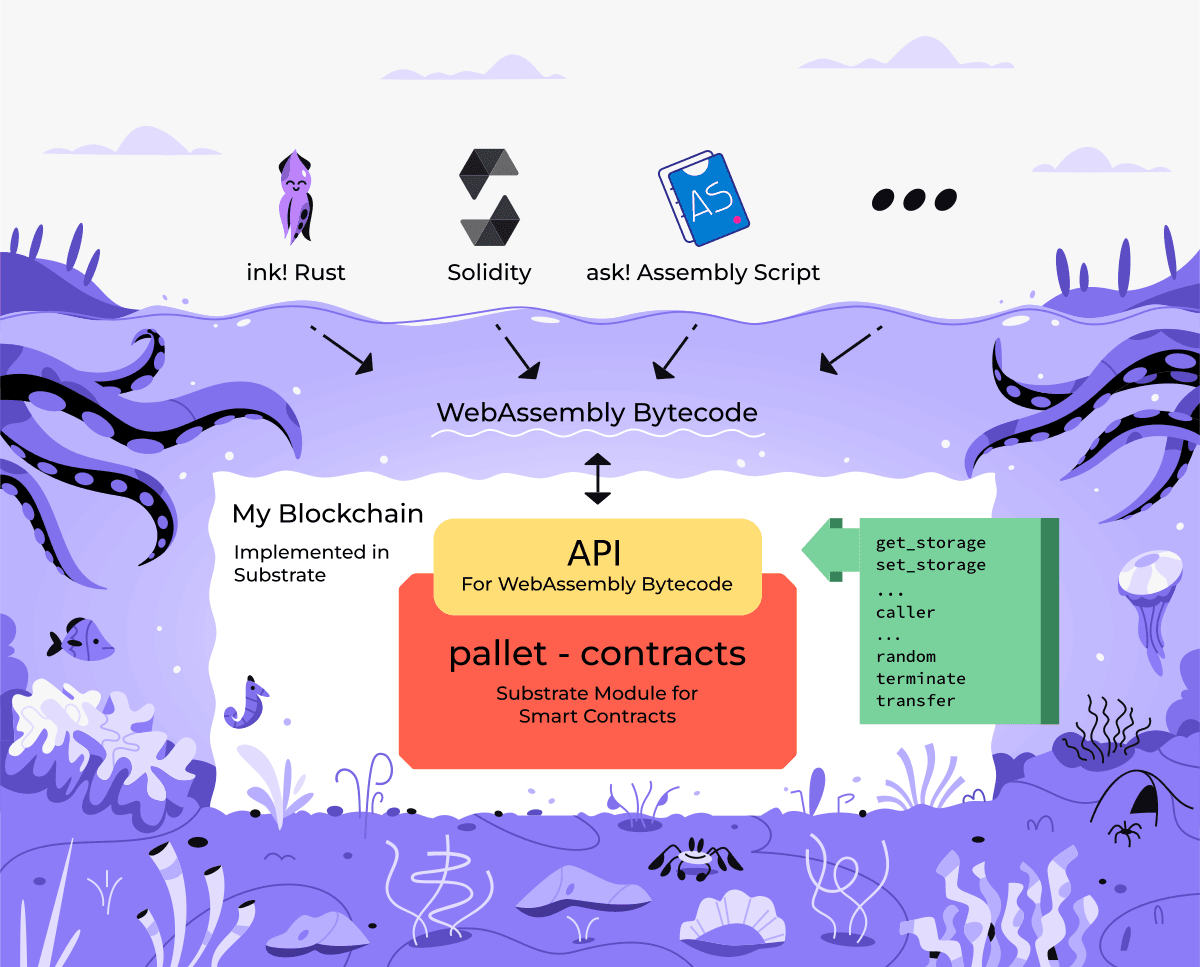
What is Ink!?
Ink! is a smart contract language developed by Parity Technologies. First introduced in 2018, Ink! has continued to evolve, with the latest version (as of this writing) being Ink! 5.0.
Ink! designed for Substrate-based blockchains comes with Contract Pallet, a runtime module that allows developers to deploy and execute smart contracts on the Polkadot network. It's based on Rust, a popular programming language known for its performance and safety features.
Setting Up Your Environment
Before we start coding, we need to set up our development environment. Take it easy; it's not as complicated as it sounds. Here's what you need to do:
1. Install Rust
You can follow the official Rust installation guide here.
For Linux or macOS, you can use the following command:
curl --proto '=https' --tlsv1.2 -sSf https://sh.rustup.rs | sh
If you're using Windows, you can download the installer from the official website.
In addition to Rust, installation requires a C++ compiler that supports C++17
rustup component add rust-src
Check if Rust is installed correctly by running:
rustc --version
2. Install the ink! CLI
The ink! CLI is a command-line tool that helps you create, build, and deploy smart contracts. You can install it using Cargo, Rust's package manager:
cargo install --force --locked cargo-contract
Check if the installation was successful by running:
cargo contract -V
3. Setup local Substrate Node
To easy the development process, we will use substrate-contracts-node which is configured to include the Contract Pallet.
There are two ways to set up a local Substrate node:
Use released binaries (recommended): You can download the latest release from the official repository.
Build from source: You will need to install all required dependencies for building Substrate. You can find the instructions here. After that, you will run the following commands:
cargo install contracts-node
4. Install Polkadot JS Extension
The Polkadot JS Extension is a browser extension that allows you to interact with the Polkadot network. You can install it from the Official Chrome Web Store.
That's it! You're all set up and ready to start coding. 😎 😎 😎
Writing Your First Smart Contract - Hello world
Now that we have our environment set up, let's write our first smart contract. We'll create a simple contract that stores a single value and allows us to read and update it.
1. Create a new project
Create a new project using the ink! CLI:
Open your terminal and execute the following command using the ink! CLI to initiate a new project:
cargo contract new hello_world
Feel free to replace "hello_world" with a project name of your preference.
This command will generate a new project with the following structure:
hello_world
├── Cargo.toml
├── lib.rs
2. Break down the components:
Cargo.toml: This file includes the project's metadata and dependency specifications. You can enrich your project by incorporating additional dependencies here as needed. For the scope of this initial contract, we'll retain the default configuration.
Default ink! dependencies are already included in the Cargo.toml file. You can find them under the [dependencies] section.
[dependencies]
ink = { version = "5.0.0", default-features = false }
lib.rs: Contains the code that defines its logic. We'll be focusing our efforts here to implement the desired functionality.
3. Implement the smart contract
Open the lib.rs file in your favorite code editor and clear the existing content. Replace it with the following code:
#![cfg_attr(not(feature = "std"), no_std, no_main)]

#[ink::contract]
mod hello_world {
    use ink::prelude::string::String;

    /// Defines the storage of your contract.
    /// Add new fields to the below struct in order
    /// to add new static storage fields to your contract.
    #[ink(storage)]
    pub struct HelloMessage {
        author: AccountId,
        message: String,
        count: u64,
    }

    impl HelloMessage {
        /// Constructor that initializes the `HelloMessage` struct with default values.
        #[ink(constructor)]
        pub fn default() -> Self {
            Self {
                author: Self::env().caller(),
                message: String::from("Hello, World!"),
                count: Default::default(),
            }
        }

        /// A function that returns the current state of your contract.
        #[ink(message)]
        pub fn get(&self) -> (AccountId, String, u64) {
            (self.author, self.message.clone(), self.count)
        }

        /// A function that allows the caller to set a new message.
        #[ink(message)]
        pub fn set(&mut self, new_message: String) {
            self.author = self.env().caller();
            self.message = new_message;
            self.count = self.count.checked_add(1).unwrap();
        }
    }
}
Let's break down the code:
Contract is defined as a module using the #[ink::contract] attribute macro.
#[ink::contract]: This attribute macro marks the module as a contract, acting as the entry point for the ink! framework. This macro works behind the scenes to generate the essential code, ensuring compatibility with the ink! ecosystem.#[ink(storage)]: This attribute macro marks the struct as a storage struct. It tells the ink! framework that the struct contains storage fields that need to be persisted on-chain. In ink!, you can have only one struct marked with the
#[ink(storage)]attribute within a single contract. If you need multiple storage structs, you can nest them within the primary storage struct. In this case, we have some storage field:author of type
AccountId, which stores the address of the account that call the contract.message of type
String, which stores the message we want to display. To use the String type, we need to import it from the ink::prelude module using useink::prelude::string::String.count of type
u64, which stores the number of times the message has been updated.#[ink(constructor)]: This attribute macro marks the function as a constructor. It's called when the contract is deployed and initializes the contract's storage fields with default values.#[ink(message)]: This attribute macro marks the function as a callable message. It's a function that can be called by external accounts to interact with the contract. In this contract, we have two messages:get: Returns the current state of the contract, including the author address, message, and count.set: Allows the caller to set a new message. It increments the count by one and updates the author every time the message is changed.
Read more about ink! attributes here. For more storage types, you can refer to the here.
Make some unit tests
#[cfg(test)]
mod tests {
    use super::*;

    #[ink::test]
    fn default_works() {
        let accounts = ink::env::test::default_accounts::<ink::env::DefaultEnvironment>();

        // Set the contract as callee and Alice as caller.
        let contract = ink::env::account_id::<ink::env::DefaultEnvironment>();
        ink::env::test::set_callee::<ink::env::DefaultEnvironment>(contract);
        ink::env::test::set_caller::<ink::env::DefaultEnvironment>(accounts.alice);
        let hello_message = HelloMessage::default();
        assert_eq!(
            hello_message.get(),
            (accounts.alice, "Hello, World!".to_string(), 0)
        );
    }

    #[ink::test]
    fn it_works() {
        let accounts = ink::env::test::default_accounts::<ink::env::DefaultEnvironment>();
        // Set the contract as callee and Alice as caller.
        let contract = ink::env::account_id::<ink::env::DefaultEnvironment>();
        ink::env::test::set_callee::<ink::env::DefaultEnvironment>(contract);
        ink::env::test::set_caller::<ink::env::DefaultEnvironment>(accounts.alice);

        let mut hello_message = HelloMessage::default();
        assert_eq!(
            hello_message.get(),
            (accounts.alice, "Hello, World!".to_string(), 0)
        );

        ink::env::test::set_caller::<ink::env::DefaultEnvironment>(accounts.bob);

        hello_message.set("Hello, I'm Bob".to_string());
        assert_eq!(
            hello_message.get(),
            (accounts.bob, "Hello, I'm Bob".to_string(), 1)
        );
    }
}
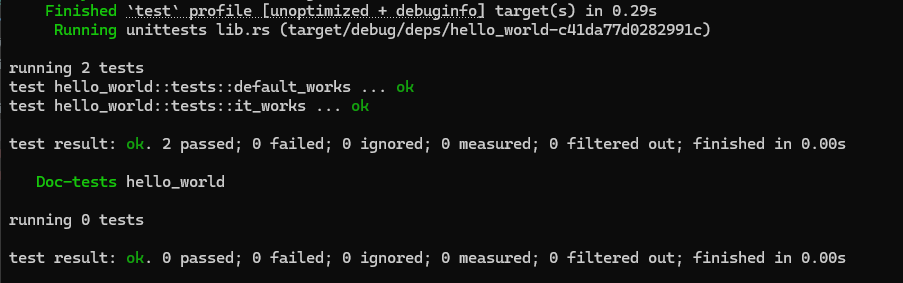
Run the test using the following command:
cargo test
If the test passes, you should see the following output:
Final code:
#![cfg_attr(not(feature = "std"), no_std, no_main)]

#[ink::contract]
mod hello_world {
    use ink::prelude::string::String;

    /// Defines the storage of your contract.
    /// Add new fields to the below struct in order
    /// to add new static storage fields to your contract.
    #[ink(storage)]
    pub struct HelloMessage {
        author: AccountId,
        message: String,
        count: u64,
    }

    impl HelloMessage {
        /// Constructor that initializes the `HelloMessage` struct with default values.
        #[ink(constructor)]
        pub fn default() -> Self {
            Self {
                author: Self::env().caller(),
                message: String::from("Hello, World!"),
                count: Default::default(),
            }
        }

        /// A function that returns the current state of your contract.
        #[ink(message)]
        pub fn get(&self) -> (AccountId, String, u64) {
            (self.author, self.message.clone(), self.count)
        }

        /// A function that allows the caller to set a new message.
        #[ink(message)]
        pub fn set(&mut self, new_message: String) {
            self.author = self.env().caller();
            self.message = new_message;
            self.count = self.count.checked_add(1).unwrap();
        }
    }

    #[cfg(test)]
    mod tests {
        use super::*;

        #[ink::test]
        fn default_works() {
            let accounts = ink::env::test::default_accounts::<ink::env::DefaultEnvironment>();

            // Set the contract as callee and Alice as caller.
            let contract = ink::env::account_id::<ink::env::DefaultEnvironment>();
            ink::env::test::set_callee::<ink::env::DefaultEnvironment>(contract);
            ink::env::test::set_caller::<ink::env::DefaultEnvironment>(accounts.alice);
            let hello_message = HelloMessage::default();
            assert_eq!(
                hello_message.get(),
                (accounts.alice, "Hello, World!".to_string(), 0)
            );
        }

        #[ink::test]
        fn it_works() {
            let accounts = ink::env::test::default_accounts::<ink::env::DefaultEnvironment>();
            // Set the contract as callee and Alice as caller.
            let contract = ink::env::account_id::<ink::env::DefaultEnvironment>();
            ink::env::test::set_callee::<ink::env::DefaultEnvironment>(contract);
            ink::env::test::set_caller::<ink::env::DefaultEnvironment>(accounts.alice);

            let mut hello_message = HelloMessage::default();
            assert_eq!(
                hello_message.get(),
                (accounts.alice, "Hello, World!".to_string(), 0)
            );
             // Set Bob as caller.
            ink::env::test::set_caller::<ink::env::DefaultEnvironment>(accounts.bob);

            hello_message.set("Hello, I'm Bob".to_string());
            assert_eq!(
                hello_message.get(),
                (accounts.bob, "Hello, I'm Bob".to_string(), 1)
            );
        }
    }
}
Compiling and Deploying Your Smart Contract
Now that we have our smart contract ready, let's compile and deploy it on the local Substrate node.
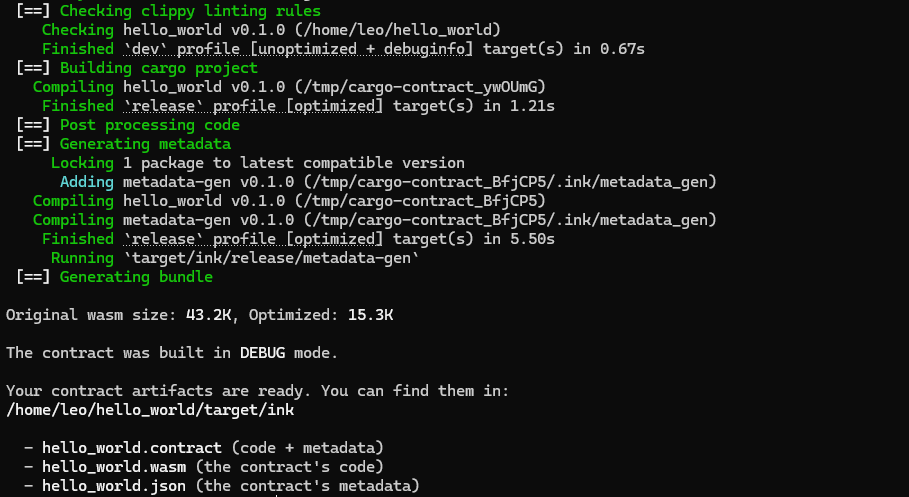
1. Compile the smart contract
Run the following command to compile the smart contract:
cargo contract build
If the compilation is successful, you should see the following output:
2. Deploy the smart contract on the local Substrate node
To deploy the smart contract, we need to start the local Substrate node. Navigate to the directory where you have the substrate-contracts-node binary and run the following command:
substrate-contracts-node
Once the node is up and running, you will see the following output:

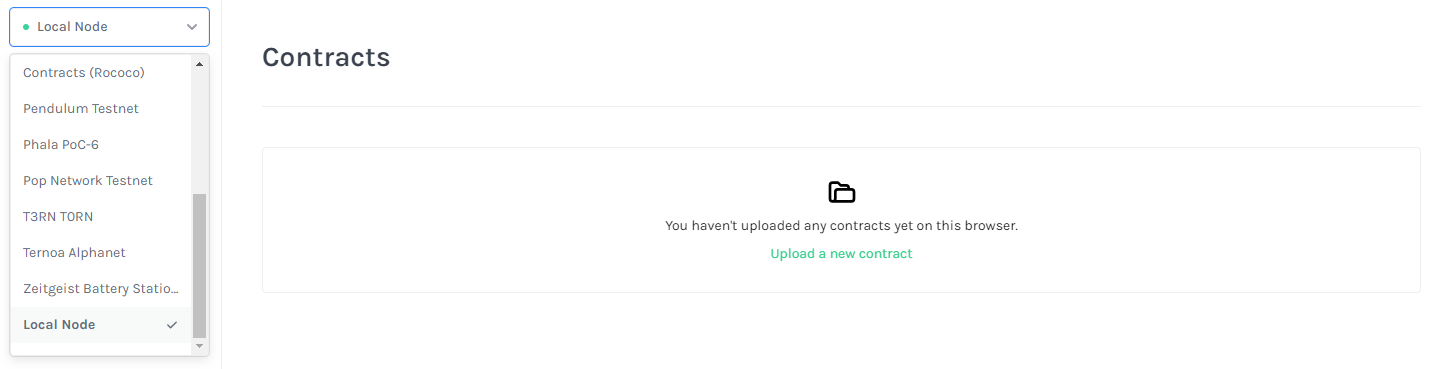
Open browser and navigate to https://ui.use.ink/ to access the ink! UI. A UI for deploying and interacting with ink! smart contracts.
At the top left corner, you will see a combobox to select the network. Choose Local Node to connect to your local Substrate node.
Next, click on the Add new contract button to navigate to the upload contract page. Click Upload new contract code, choose account what you want to deploy the contract, and select the hello_world.contract file in the target/ink directory of your project.
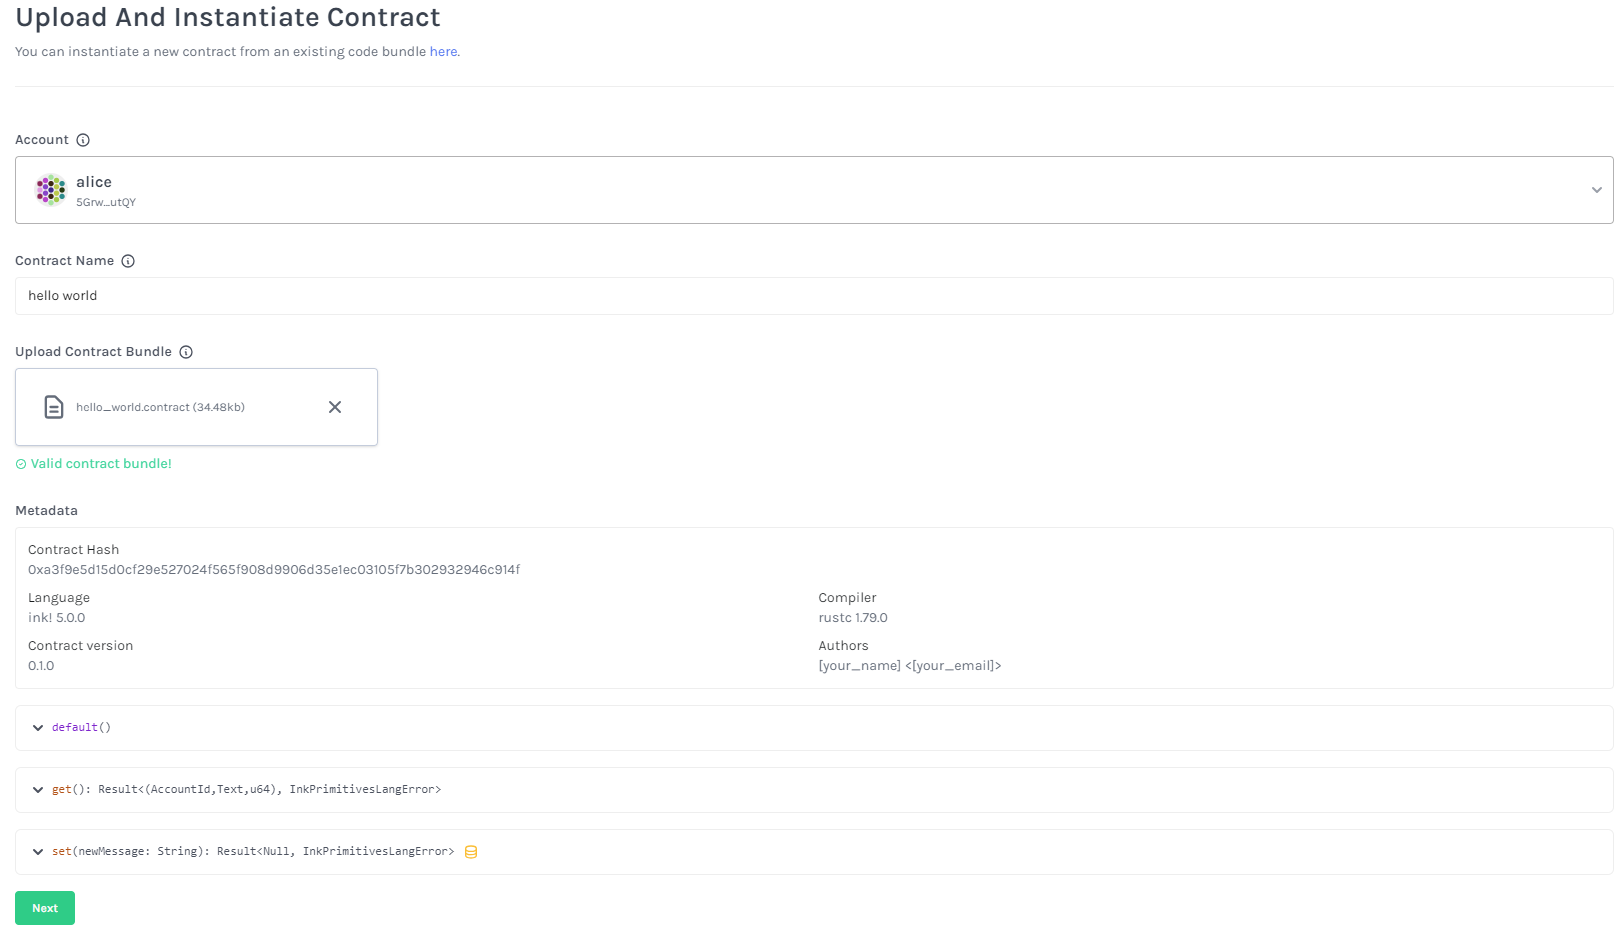
Click on Next button, and you will see the contract details.
If you have more than one contructor, you can choose the constructor you want to deploy.

Click on the Next button again, after that, you will see the contract code hash and data. At this point, you need click on the Upload and Instantiate button to deploy the contract.
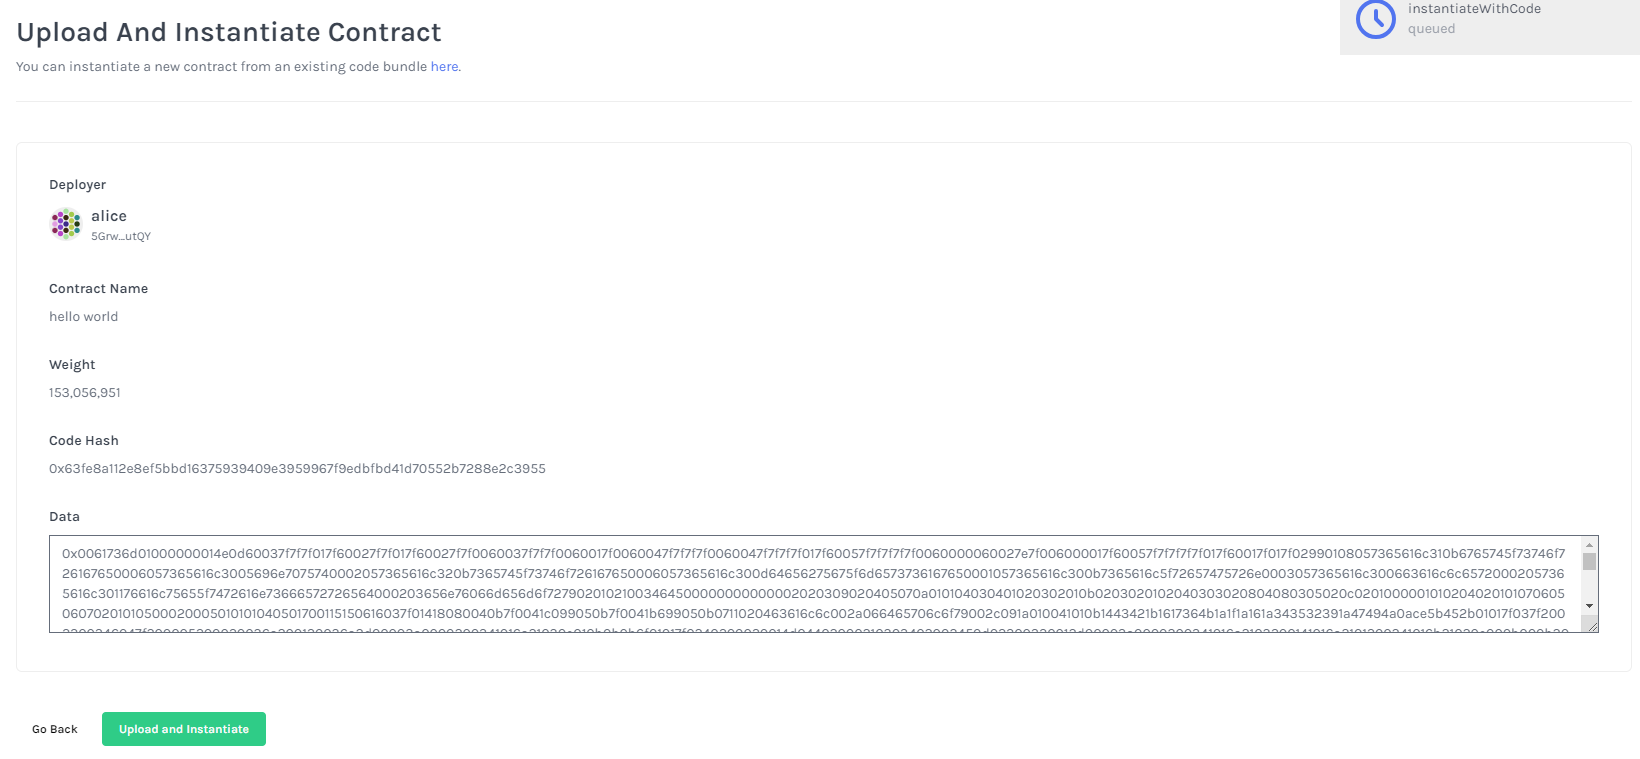
If the deployment is successful, you will see the following output:
3. Interacting with Your Smart Contract
Now that we have deployed our smart contract, let's interact with it using the ink! UI.
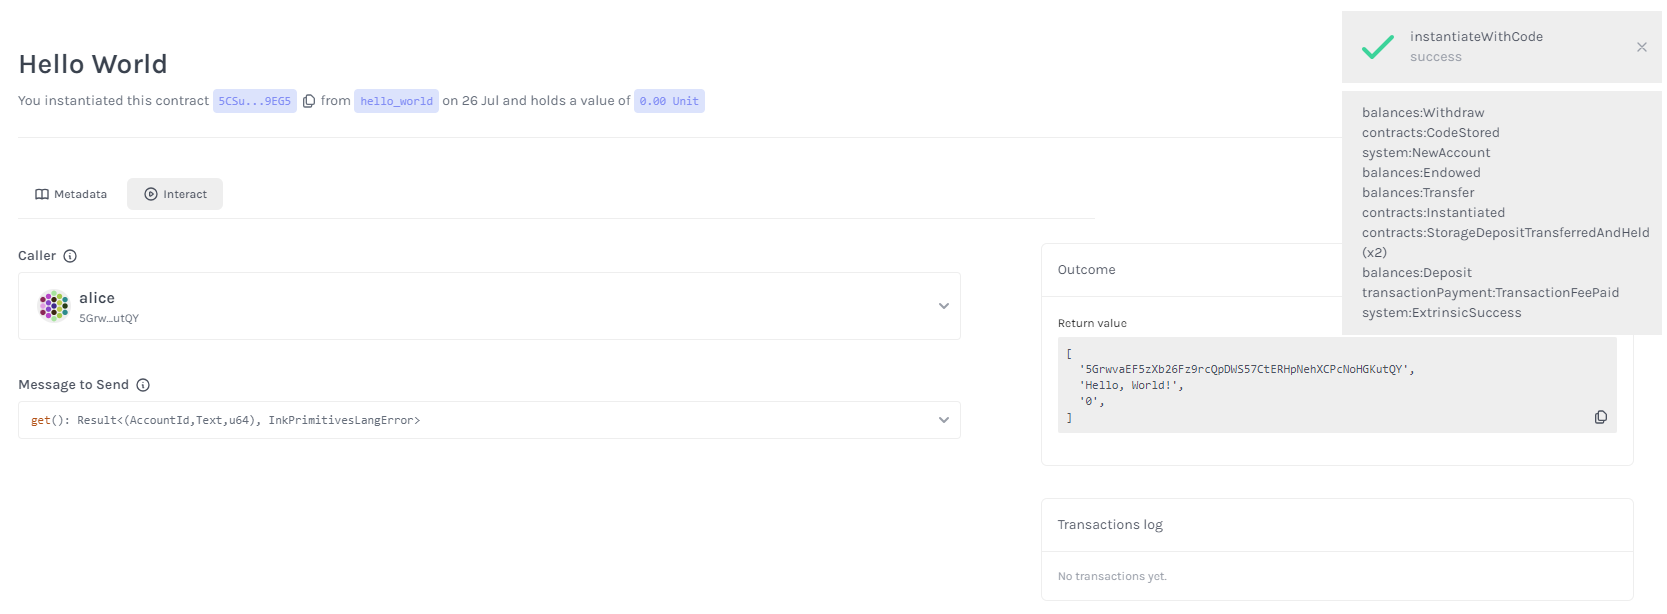
On the ink! UI, you will see the contract you just deployed. Click on the contract name button to navigate to the contract page.
At this point, you can interact with the contract by calling the get and set functions.
- For
getmessage, just choose any caller you want to call the contract and choose get message fromMessage to Sendcombobox. It will return the current state of the contract immediately and display the result on the right side.

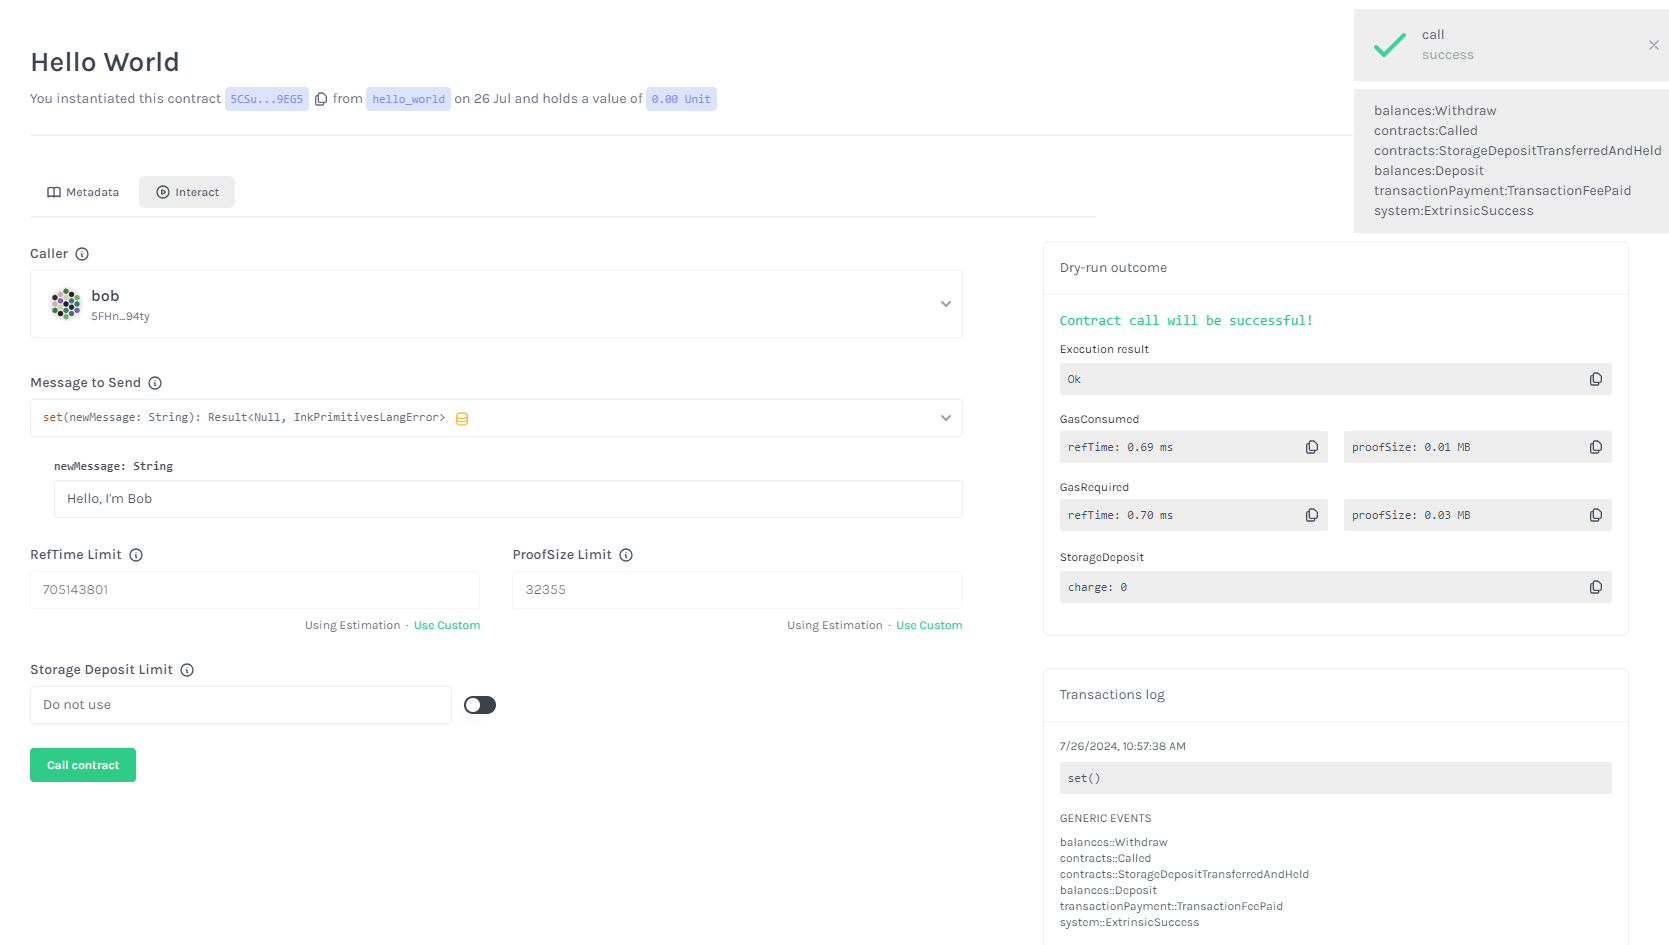
- For
setmessage, you can switch the caller if you want to change the author of the message. Choose set message fromMessage to Sendcombobox, enter the new message you want to set in the new_message field, and click on theCallcontract button.
That's it! You've successfully deployed and interacted with your first ink! smart contract. 🎉
Conclusion
In this tutorial, you learned how to build a simple smart contract using ink!, Polkadot's smart contract language. You set up your development environment, wrote your first smart contract, compiled and deployed it on the local Substrate node, and interacted with it using the ink! UI.
This is just the beginning of your journey into the world of decentralized applications on Polkadot. There's so much more to explore and build. I encourage you to dive deeper into the ink! documentation and experiment with more complex smart contracts.